
Group Manager Bukkit Permissions Plugin Tutorial
On
13.09.12 • In
Blog • by
Minecraft Server Australia

What Is Group Manager?
Group Manager is a Bukkit plugin part of the Essentials kit that allows you to set up permissions for groups, and add users to these groups. The result is you can have multiple tiers of access to commands. This is useful for most Minecraft servers, as it lets you build a community, without it you may struggle to balance the right number of admins with users. Group Manager allows you to give certain groups access to certain commands without having to make them operators. You can setup groups such as Moderators, Admins, Locals and Default users, etc.
We have written a tutorial on how to setup Group Manager on your Bukkit Minecraft Server.
Step 1:
First to setup Essentials Group Manager… Go to http://dev.bukkit.org/server-mods/essentials/ and click the link “Download GroupManager” as per the screenshot below.

First to setup Essentials Group Manager… Go to http://dev.bukkit.org/server-mods/essentials/ and click the link “Download GroupManager” as per the screenshot below.
Step 2:
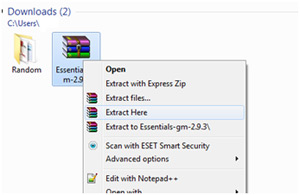
Extract the Zip file. I recommend using WinRAR: http://www.rarlab.com/download.htm
Two files will be extracted: “EssentialsGroupManager.jar”, “EssentialsGroupManagerBridge.jar”
Extract the Zip file. I recommend using WinRAR: http://www.rarlab.com/download.htm
Two files will be extracted: “EssentialsGroupManager.jar”, “EssentialsGroupManagerBridge.jar”
Step 3:
Log into your server FTP and upload both of these files into the “plugins” folder.
I recommend using FileZilla Client for the following Steps: http://filezilla-project.org/
Log into your server FTP and upload both of these files into the “plugins” folder.
I recommend using FileZilla Client for the following Steps: http://filezilla-project.org/
Step 4:
Restart your server in Multicraft, so the Group Manager configuration files generate.
Then go into your FTP again, under “plugins” and look for the “GroupManager” folder.
If it is there, “Stop” your server in Multicraft.
If it is not, ensure you have done Step 3 correctly; and restart steps 3 & 4.
Restart your server in Multicraft, so the Group Manager configuration files generate.
Then go into your FTP again, under “plugins” and look for the “GroupManager” folder.
If it is there, “Stop” your server in Multicraft.
If it is not, ensure you have done Step 3 correctly; and restart steps 3 & 4.
Step 5:
Go into the “GroupManager” folder and you should the same files and folders as below..
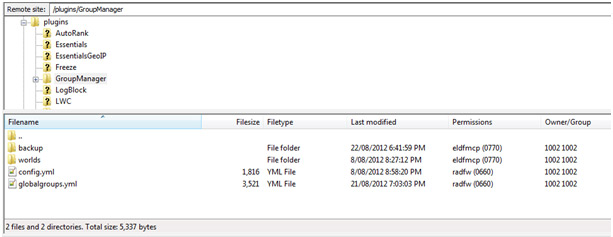
Go into the “GroupManager” folder and you should the same files and folders as below..
Step 6:
Open the “globalgroups.yml” (Right click and select “view/edit”)
These are the permissions that are global to all worlds, if set up that way. Further on I will show you how to link the world permissions to global groups.
I recommend using Notepad++ if you are running Windows: http://notepad-plus-plus.org/download/v6.1.6.html
Step 7:
In the globalgroups.yml file you will see allot of permissions. Unless you know what to do with these, highlight everything and delete all of it.
OR:
I have made a starting set of permissions and groups that you can use. You may use these or the default ones that Group Manager starts with. For starting off it may be easier to start with these. Unzip this file and place the "Group Manager" folder into your “plugins” folder. Note everything in this is setup assumes your world is named “world”.
Download the Zip file here
Step 8:
In the globalgroups.yml you can add nodes of permissions under each heading for example, under Default you could put:essentials.afk This allows the player to use the /afk command. All permissions for your plugins, should be easily available on the bukkit page for your plugin at www.bukkit.org. (Ensure when you are adding permissions, you use spaces rather than TABS, this can cause many formatting issues, also ensure you are in line with the other permissions nodes, one node per line)
Once you have added all your permission nodes, it may look something like this (Note the permissions in this are for the “Essentials” plugin):

We recommend having the groups “g:default”, “g:moderator”, “g:admin” as your starting blocks in the “globalgroups,yml”
In the globalgroups.yml you can add nodes of permissions under each heading for example, under Default you could put:essentials.afk This allows the player to use the /afk command. All permissions for your plugins, should be easily available on the bukkit page for your plugin at www.bukkit.org. (Ensure when you are adding permissions, you use spaces rather than TABS, this can cause many formatting issues, also ensure you are in line with the other permissions nodes, one node per line)
Once you have added all your permission nodes, it may look something like this (Note the permissions in this are for the “Essentials” plugin):
We recommend having the groups “g:default”, “g:moderator”, “g:admin” as your starting blocks in the “globalgroups,yml”
Step 9:
The next step is to go to the “worlds” folder in the “GroupManager” folder. Each one of these folder in the “worlds” folder represents your worlds. This is where the “globalgroups.yml” comes in to place. Open up the folder of your main world. The default world name is “world”. In this folder you will see “groups” and “users”. Open “groups”. It will have a similar look to this:
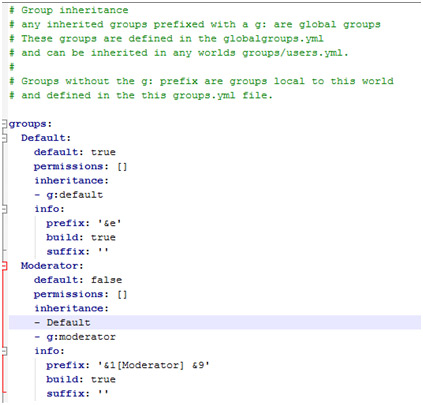
Notice under inheritance how it links to g:default. This means that it inherits the commands from g:default in the globalgroups.yml. If you wanted each world to have different permissions you see you can also change that here. “default” means that’s the group people are going to be in by “default” when they join the world. And “prefix” and “suffix” is words or symbols you want to put before or after a player’s name. Such as the rank name in this case, the symbols infront such as “&0&o” mean it’s going to be a Black Italic format. Save and close once you have done setting this up.
We recommend having the groups “Default”, “Moderator”, “Admin” as your starting blocks in the world “groups.yml”
The next step is to go to the “worlds” folder in the “GroupManager” folder. Each one of these folder in the “worlds” folder represents your worlds. This is where the “globalgroups.yml” comes in to place. Open up the folder of your main world. The default world name is “world”. In this folder you will see “groups” and “users”. Open “groups”. It will have a similar look to this:
Notice under inheritance how it links to g:default. This means that it inherits the commands from g:default in the globalgroups.yml. If you wanted each world to have different permissions you see you can also change that here. “default” means that’s the group people are going to be in by “default” when they join the world. And “prefix” and “suffix” is words or symbols you want to put before or after a player’s name. Such as the rank name in this case, the symbols infront such as “&0&o” mean it’s going to be a Black Italic format. Save and close once you have done setting this up.
We recommend having the groups “Default”, “Moderator”, “Admin” as your starting blocks in the world “groups.yml”
Step 10:
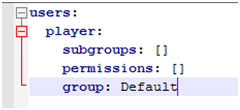
Still in your world folder, go to the “users.yml”. These are all the listed players, and what rank they are in that world. It will look a little similar for each player below. Notice how you can add permissions to each player too? For individual users I highly recommend you use commands to add permissions and other prefixes etc. You can find the permissions here: http://wiki.ess3.net/wiki/Group_Manager/Commands
Save and close once you have finished updating the details.
Mirroring Worlds:
Mirrors can be used to list the different Worlds on your server and have their settings mirrored in their children.
Open the main “GroupManager” folder. Then open the “config.yml”

What we are looking at here is “mirrors” the way the mirror function works is that it allows a specific world to be the main world, and the other worlds, underneath it, to copy the User or Groups, or both, of the main world. Above you can see that “world” is our main world, and then below there is “world_nether” and “world_the_end”. These two worlds mirror the users and groups of “world” as seen by the two sub lines below the world names. You can have both or one or the other. If you don’t mirror the world here it that means it will need to be separately setup for permissions and groups in that world. See Step 9 above. Once again ensure everything is in line with the other world name and sub texts, and that you use SPACES not TABS.
Save and close once you have finished updating the details.
Once you have made these adjustments Start or Restart your server and check for errors in the Console.
Errors
When an issue does arise, an ERROR.LOG will appear in the “GroupManager” folder. Open this up and check for the two highlighted area on the picture below.
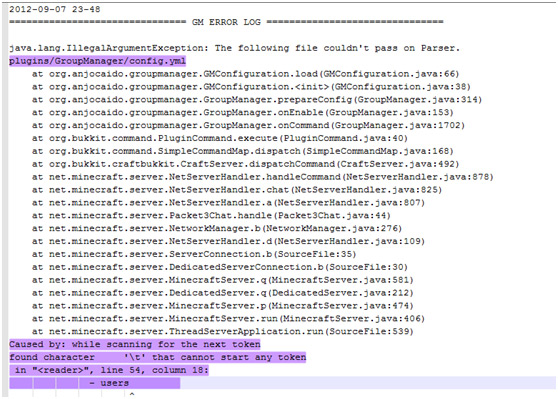
The first highlighted region tells you what file is corrupted. The second tells you where about, and what its issues is. If you have any issues with this, and cannot find the issues, email this log to us or use our contact form explaining what you are trying to do and what your issue is, and we can look at it for you.
If you have any further queries about Group Manager, or think something should be added, let us know and we will do our best to work with you on your question or adding the content to the tutorial. We hope this tutorial helps!
Open the main “GroupManager” folder. Then open the “config.yml”
What we are looking at here is “mirrors” the way the mirror function works is that it allows a specific world to be the main world, and the other worlds, underneath it, to copy the User or Groups, or both, of the main world. Above you can see that “world” is our main world, and then below there is “world_nether” and “world_the_end”. These two worlds mirror the users and groups of “world” as seen by the two sub lines below the world names. You can have both or one or the other. If you don’t mirror the world here it that means it will need to be separately setup for permissions and groups in that world. See Step 9 above. Once again ensure everything is in line with the other world name and sub texts, and that you use SPACES not TABS.
Save and close once you have finished updating the details.
Once you have made these adjustments Start or Restart your server and check for errors in the Console.
Errors
When an issue does arise, an ERROR.LOG will appear in the “GroupManager” folder. Open this up and check for the two highlighted area on the picture below.
The first highlighted region tells you what file is corrupted. The second tells you where about, and what its issues is. If you have any issues with this, and cannot find the issues, email this log to us or use our contact form explaining what you are trying to do and what your issue is, and we can look at it for you.
If you have any further queries about Group Manager, or think something should be added, let us know and we will do our best to work with you on your question or adding the content to the tutorial. We hope this tutorial helps!
One Response
I know I’ve been enquiring about how to set this up, and this just helps so much.
Good work, much appreciated. :)